Using the re:Members AMS Avalara Integration
Avalara generates sales and use tax percentage based on geographic location, using the customer shipping address—if no shipping address is available, billing address is used. This data is pulled into re:Members AMS via an API call.
Currently the re:Members AMS Avalara integration is available for clients in the US and Canada.
Requirements
To use the re:Members AMS Avalara integration, clients must:
-
Have an Avalara account.
-
Be US and Canada only.
For optimal results, clients are recommended to enable Google Map functionality in re:Members AMS.
Avalara Account Management
To access your Avalara Account, visit https://www.avalara.com.
For product and service taxability rules, visit https://taxcode.avatax.avalara.com/.
For an Avalara Admin Console Demonstration, visit https://www.avalara.com/learn/videos/avalara-admin-console-demo/.
If you believe Avalara is returning an incorrect percentage, contact Avalara at (877) 780-4848 or http://www.avalara.com.
Configuration
The re:Members AMS Avalara configuration requires two actions in re:Members AMS:
-
The integration must be enabled in re:Members AMS, using Avalara account details.
-
Default tax accounts must be configured in the Business Unit.
Enabling the re:Members AMS Avalara Integration
To complete required setups, clients using Avalara must obtain the following information from their Avalara account and enter it into re:Members AMS:
-
Avalara Account Number
-
Avalara License Number
-
Is this a Sandbox or Live Avalara account?
To enable the integration in re:Members AMS:
-
Navigate to the Configurations App > Integrations feature.
-
Locate the Avalara integration. If it has not yet been added, click the Add This button. Then click Manage.
-
In the Manage Integration: Avalara form, provide the following information:
-
Account Number: your Avalara Account Number.
-
Commit Documents: Allows re:Members AMS to save invoice data in Avalara and to write back to Avalara when a refund credit is issued.
-
Company Code: your Company Code in Avalara.
-
Enable Logging: Choose whether to record a log of requests from the re:Members AMS system to Avalara. (These logs are visible by clicking the View Logs button on the Manage Integration: Avalara form.)
-
License Number: your Avalara License Number.
-
Sandbox: Enable this setting if the Avalara account to be used is a sandbox. Leave deselected when using a live account.
-
Business Unit Settings
Configure the re:Members AMS Business Unit to have a Default Product Type GL Account for Tax.
-
Navigate to the Accounting App > Setup.
-
Select the Business Units menu option and Edit the desired Business Unit.
-
In the Business Unit:
-
Click the Setup tab > Default Product Type GL Account menu option.
-
Click the Add New Default Product Type GL Account button. The Add New Default Product Type GL Account form will appear.
-
In the Product Type drop down field, select “Tax.”
-
In the subsequent fields, select the appropriate AR, Revenue, Liability, and Write-Off Accounts and click Save.
-
Setup Result
Navigate to the Products App > Setup feature > Taxes menu option.
A setup like the one pictured below should be visible. This is automatically generated.

Click Edit next to State Tax and set up each state.
Every time a taxable product is purchased in a different city, county, local area, or state, re:Members AMS automatically pulls in that locality and tax percentage from Avalara.
This percentage is visible by clicking Edit next to City Tax, County, Tax, Local Tax, National Tax, Other Tax or State Tax (as shown in the image above) and by clicking the Prices tab. This area displays the various tax percentages listed for each City, County, and so on.
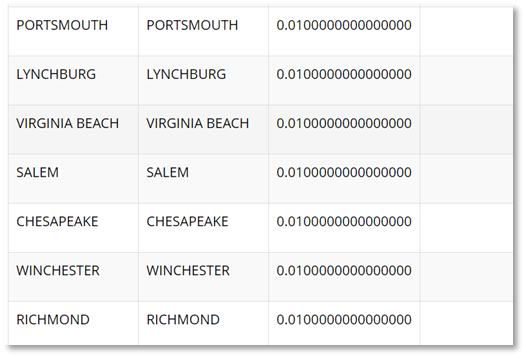
Note: Note: These values are imported from Avalara and should not be edited, adjusted, or removed. If these are adjusted, the integration will automatically recreate the tax for that locality and overwrite your changes.
Note: If you believe the tax percentage imported from Avalara is incorrect, contact Avalara directly. These values cannot be adjusted in, or by, re:Members AMS.
Note: If, prior to the Avalara integration, tax percentages were already configured in re:Members AMS, it’s recommended that these old “prices” be end-dated. This will help keep the price list tidy and remove any non-functioning, old setups from the primary list. (Even if these old prices are not end dated, the correct price imported from Avalara will still be used).
Additional re:Members AMS Setups
Once the integration is enabled, there is other tax information to consider in both customer and product configuration. These settings include tax exempt numbers for customers and assigning tax codes on product records.
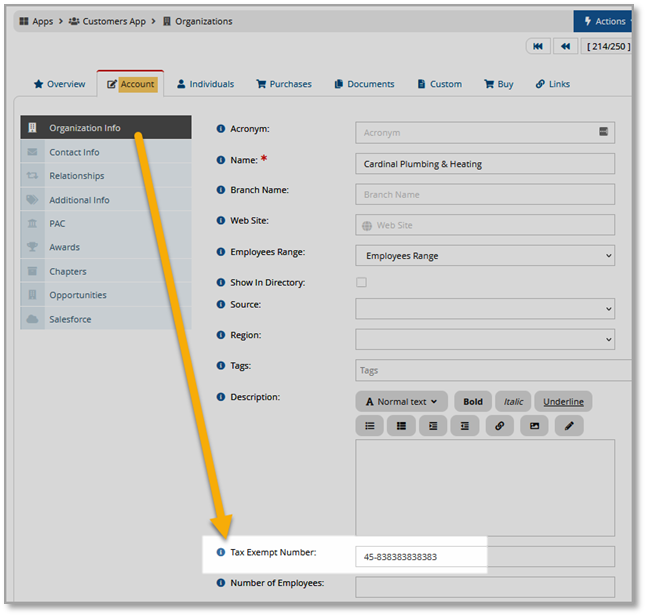
Tax Exempt Number
If a customer qualifies for tax exemption, their number must be entered into the Tax-Exempt Number field on the Customer Record > Info menu option. If a value is entered in this field that data is passed to Avalara.
Tax Codes
A tax code can be assigned per product in re:Members AMS.
What are Tax Codes? Tax codes are laws and rules that determine how items are taxed, depending on the jurisdiction. Items not mapped to tax codes are taxed as if they are tangible personal property at the standard rate for each jurisdiction.
The list of selectable tax codes is imported from Avalara and cannot be edited in re:Members AMS. When a product with an assigned tax code is purchased and that data passed to Avalara, the tax code assigned in re:Members AMS will be associated with that product in Avalara.
Assigning Tax Codes in re:Members AMS:
-
In re:Members AMS, navigate to the Product Record.
-
Click the Details tab > Additional Info menu option.
-
Locate the External Tax Code lookup field. Begin typing the name of the tax code and choose from the suggested list.
-
Click Save.
Communication Between re:Members AMS & Avalara
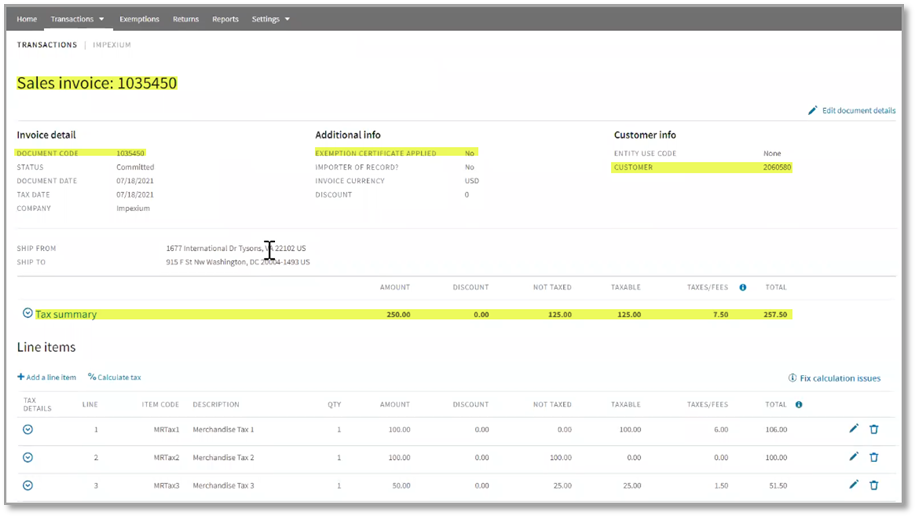
Data from re:Members AMS such as the invoice number, purchase date, exemption status, and customer number are all passed from re:Members AMS to Avalara.
If external tax codes were configured for re:Members AMS products, those will be visible in Avalara as well.
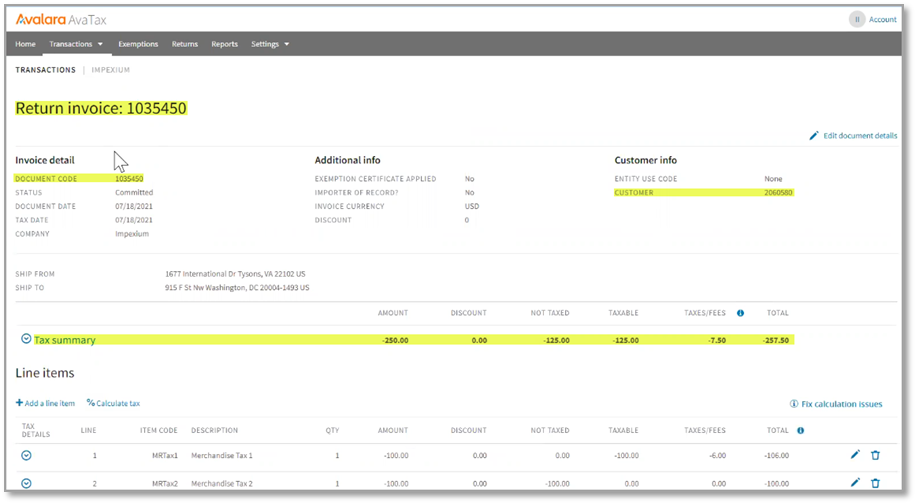
When a return is made in re:Members AMS, transaction info updates in Avalara to show the title, “Return Invoice,” and to show negative values for the tax summary.