Creating Roles
Administrators can create custom roles allowing staff access only to certain areas of the system.
Use Case: An association has several staff users who should be able to see and query on customer data via the Customers App, but they should not be able to see any other applications in the system such as accounting information, product setup, administrator options, etc.
A custom role called "CRM Level 1" is created by their re:Members AMS administrator, allowing access only to the Customers App > Individuals feature, the Customers App > Organizations feature, and the Customers App > Queries feature. Users with this role can only see the Customers App and those three options under it.
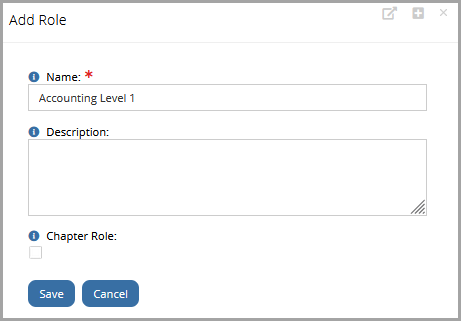
To create a new role:
-
Navigate to the Users App.
-
Click the Roles feature.
-
Click Add Role .
-
Enter the role Name.
-
Enter a role Description (if desired).
-
Click Save.
-
Once a role is created, security permissions must be applied to it. See: Assigning Security Permissions to User Roles.
Chapter Roles
For clients using enhanced chapter functionality, chapter roles can also be configured to allow chapter staff to manage information specific to their chapter(s). For details, see Using Chapter Roles.
Testing User Roles
When configuring any user role, testing is an important part of ensuring that the role functions in the desired way before assigning the role to users. When preparing to test a role, it's important to know what permissions a user with that role should have.
Once a role is configured, to test:
-
Locate or create an example individual who you can log in as. This individual must have an email--an example email can be used--associated with their account
Tip: Do not test the role with your own user login: settings on any existing role(s) you have will interfere with your ability to properly test the new role. Removing role(s) from your own login will cause you to lose access to those permissions.
-
On the example Individual Record > Overview tab, click the User Profile button. (If the User Profile has not been created yet, click the Create User button.)
-
In the User Profile, scroll to the Roles section at the bottom of the page.
-
Click Add Role and assign the role to be tested to that user.
-
Log in as the example user. Use one of the following:
-
Incognito / Private Browser tab: Open an "incognito" or private browser tab for the web browser and log in as the example user.
-
Alternate Browser: Open a browser different from the one you are currently logged into the system as your own account. (For example, if you are logged in as yourself via the Firefox browser, open Chrome and log in as the example user there.)
-
-
As the example user, verify that the role imparts all the desired permissions. If necessary, return to your own login to the system and edit the role to achieve the desired effect.