Creating a New Product
When creating a new product, certain fields are available regardless of the product type being created.
Note: Because products share so many of the same essential settings, the term "products" in re:Members can include anything that can be sold. E.g.: events, memberships, merchandise, publications, certifications, sponsorships.
To create a new product:
-
Navigate to the app of the product type you wish to create a new instance of.
Example: Events App to setup a new event or the Merchandise App to add a new piece of merchandise.
-
Click the corresponding feature within the selected app.
Example: Events feature or Merchandise feature.
-
Click the green Add New button at the top of the Search Results.
-
Complete all required fields in the Add New form.
-
Code: A unique identifier for the record. Codes should be brief and should not contain spaces.
-
Name: The display name of the product.
-
Available From: The date on which the product becomes active, meaning available for use.
-
Available Until: The date on which the product is no longer available for purchase.
-
Is Public: Makes the record visible to non-staff users. If left deselected, only staff users can view or purchase the product. The Is Public check box should not be checked until the product is completely configured and tested.
-
Is Free: Flags the product with a zero cost. Clicking this check box removes the select Merchant option and automatically creates a price of zero dollars. Prices created using this method must still have GL Accounts applied on the Price Record.
-
Merchant: Choose the credit card merchant to be used when the product is purchased. If this field is blank, the default credit card merchant is used.
-
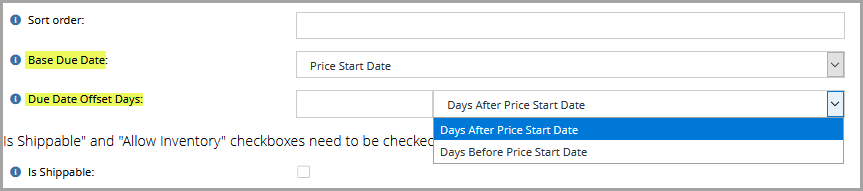
Sort Order: Records are sorted alphabetically, by default, but in the case of events they are sorted by date first, then alphabetically. To sort manually, enter a number in the Sort Order field-records with the lowest number will be listed at the top.
-
Base Due Date: The due date for the product payment.

Example: You could edit the Base Due Date setting if you were generating membership renewal orders on December 2, 2024 and payment is due on January 1, 2025, you could allow your members to have 30 days to pay by selecting the Order Date and 30 Days After Order Date.
Note: If this field is left blank, the default base due date is the order date.
To change the Base Due Date select an option from the drop-down list. Options may include:
-
Order date: Specifies the payment is due on the date the order was generated.
-
Price start date: Specifies the payment is due on the price Available From date.
-
Price end date: Specifies the payment is due on the price Available Until date.
-
Invoice date: Specifies the payment is due on the date the invoice was generated.
Note: The default setting is Order date. If Invoice date is selected, there is due date until the invoice gets created. Aging doesn't start until the invoice in created.
-
Effective date (memberships, subscriptions, certifications, and certification applications only)
-
Start date (events, sessions, exhibits, and courses only)
-
End date (events, sessions, exhibits, and courses only)
-
Early registration date (events, sessions, exhibits, and courses only)
-
Regular registration date (events, sessions, exhibits, and courses only)
-
Late registration date (events, sessions, exhibits, and courses only)
Once an option is selected, the Due Date Offset Days field appears. Specify the number of days before or after the setting in the Base Due Date field the balance should become due.