Setting up Sessions
Event sessions allow registrants to register for "sub-events" occurring under the primary event. If sessions have been created, registrants have the option to choose the sessions they'd like to attend as they register for the event. Each session has its own pricing setup, meaning that pricing to attend the event is separate from session pricing. Sessions can also be made available to certain customer types only by using price attributes.
Sessions might include a seminar or other talk being held as part of an event, but it can also include other functions such as a dinner, a 5k run, or a golf outing.
Creating a Session
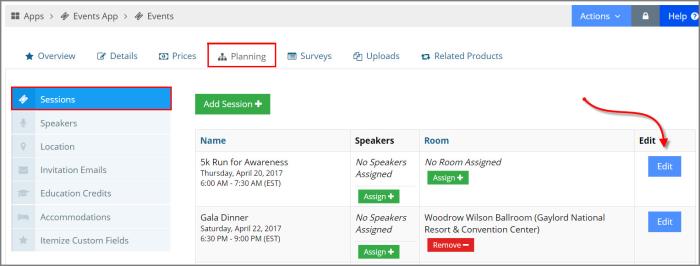
- In the Event Record, Planning tab, select the Sessions menu option. If no sessions have been created for the event, this area will be empty.
- Click the Add Session button. The Add Session form will appear. (Fields marked with an asterisk are required.)
- Enter a Code and Name for the session.
- Specify the Available From date—this is the date from which the session is available for sale. To end-date the session's availability, enter an Available Until date.
- If the session should be visible to non-staff during the Registration Wizard, click the Is Public check-box. If you prefer to make the session visible to staff only as they register on behalf of customers, leave this box unchecked.
- Is the session at no additional cost to the main event registration? Then click the Is Free check-box to have the system automatically create a zero dollar price for the session.
Note: A price must be created for each session. Sessions without prices will not appear during the checkout process. If the session is free, click the "Is Free" check-box or create a zero-dollar price in the session record. Note that Prices created as a result of clicking "Is Free" still must have the necessary price split accounts applied to them via the Price Record.
- If your system uses multiple credit card merchants, select the necessary credit card merchant from the Merchant drop-down list.
- Enter the Start and End Date & Time for the session—this is the actual start and end time of the session itself, and is different from the Available From and Until fields described above.
- Select the time zone in which the session will take place.
- To limit how many people can register for the session, click the Limit Capacity check-box. Checking this box will enable additional fields:
- Capacity: The maximum number of registrants allowed.
- Waitlist Policy: See Configuring the Waitlist for more information.
If the Event has a waitlist enabled, then a waitlist enabled on the session will need to match the payment policy selected for the event. (i.e. If the event has a waitlist where payment is collected, then a session would either have no waitlist or a waitlist where payment is collected. It could not have a waitlist where payment is not collected.)
- Using the Is Required check-box, staff can cause the session to be auto-selected for the customer during the checkout process. When this setting is enabled, the session cannot be removed from the cart during checkout.
- The Is Pre-Selected check-box automatically adds the session to the cart during checkout. The customer has the option to remove the session from their cart during checkout.
- Click Save. Clicking Save closes the Add Session form.
- Once the session has been saved, it should appear in the list of all sessions for the event.
- Click Edit to proceed with the configuration process.
Managing Sessions
Once a session has been created, additional setup is necessary in order to make the session ready for customers to see and register for it.
To set up additional information about the session, click Edit next to the session in the session list to open the Session Record.
-
Create a Session Price: A session must have a price set up under the Session Record > Prices and Discounts tab in order for customers to be able to register. A session price can be zero dollars if the session is free. Note that if the "Is Free" check-box on the session record is clicked, the Prices and Discounts tab will not appear–if the Prices and Discounts tab is hidden, uncheck the "Is Free" check-box, save, and refresh the web page. See: Setting up Product Prices
-
Set Session Type & Capacity: Go to the Session Record > Details tab to set whether the session is virtual only, and to set the capacity. (Once the session capacity has been reached, registrants attempting to register will receive a notification.)
-
Manage Session Room and Speakers: To update the session room and session speakers, navigate to the Session Record > Planning tab. Access session room options under the Session Room menu option. Add or edit session speakers via the Speakers menu option. See: Assigning a Speaker or Room to an Event Session
-
Setting Education Credits: If registrants should receive education credits from their attendance of the session, create a new or apply an existing education credit to the session under the Session Record > Planning tab > Education Credits menu option. See: Applying Education Credits to an Event
-
Upload an Image: In the Session Record > Overview tab, it is recommended that staff upload an image related to the session. Customers (non-staff) registering for an event will be able to see the session image uploaded here.
-
Upload Session-Related Documents: To share document(s) with session registrants, upload documents to the Session Record > Uploads tab. Session registrants will be able to access said documents under the Event Registration Detail in My Profile > Purchases tab > Events menu option.
-
Sending Surveys to Session Registrants: Staff can use the Qrvey survey tool to send a survey to session registrants. Access survey templates from the Session Record > Surveys tab.
Also see: